Прошивка
Оригинальные прошивки для ASIC вы найдете на сайте Bitmain.
Видео: Массовая прошивка асиков в BTC Tools
подписывайтесь
Выберите прошивку и следуйте инструкции.

Этапы подготовки:
-
Скачайте и установите Notepad++ для редактирования файлов конфигурации:
-
Загрузите и установите BTC Tools
- Windows
- Linux
-
Скачайте архив SSH Unlocker, чтобы разблокировать SSH и заменить сертификат.
-
Распакуйте архив SSH Unlocker.
- Запустите BTC Tools.
- Программа использует имя пользователя и пароль по умолчанию, которые установлены на всех устройствах Antminer.
- Если пароль в Интернете был изменен, его необходимо заменить в программе.
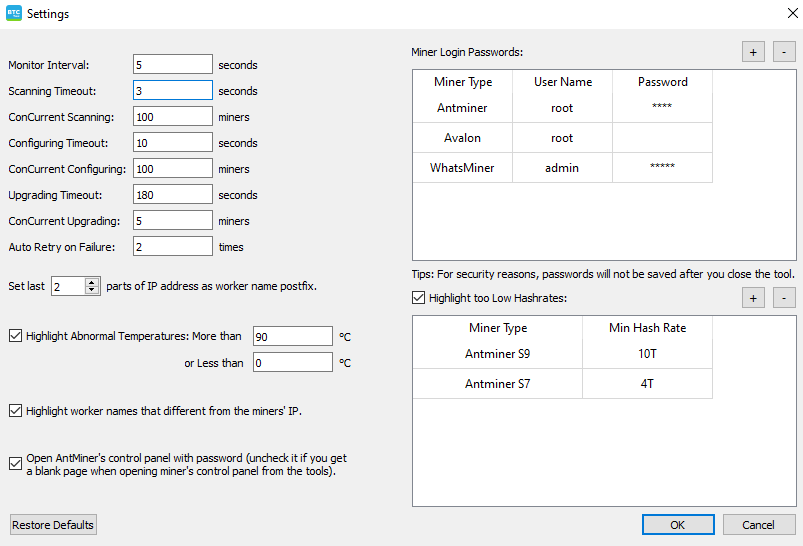
- Для этого нажмите “Settings” и в окне “Miner Login Passwords” замените пароль на пользовательский.
- Подтвердите действие, нажав “OK”.
- Просканируйте сеть, нажав кнопку “Сканировать”.
- После сканирования экспортируйте файл CSV, нажав кнопку “Экспорт”.
- Далее откройте файл CSV с помощью Microsoft Excel или любой другой программы, поддерживающей этот формат. Скопируйте список IP-адресов из таблицы.
-
Перейдите в папку с утилитой SSH Unlocker. Щелкните правой кнопкой мыши на файле ips.ini и выберите “Редактировать с помощью Notepad++”.
- Вставьте список IP-адресов и сохраните файл.
- В файле используются стандартные имя пользователя и пароль, которые установлены на всех устройствах Antminer.
- Если пароль на изменился, то же самое будет и на ssh. В этом случае необходимо заменить стандартный пароль на тот, который есть у пользователя.
- Для этого щелкните правой кнопкой мыши на файле и выберите .
- Измените пароль в строках и .
-
Запустите сценарий и дождитесь его выполнения. Во время выполнения скрипта устройства будут перегружены. Подождите около 5 минут.
- Запустите скрипт и дождитесь его выполнения.
Готово! готов к прошивке.
How to use Halab Tech Tool V1.0
● MTP-FRP Functions:
●Youtube =>>
● Browser ==>>
● Hidden Settings (Galaxy Store) ==>>
● Maps =>>
● Choose any one Option from the above list and click Start.
● Rom Beta: Read/Backup
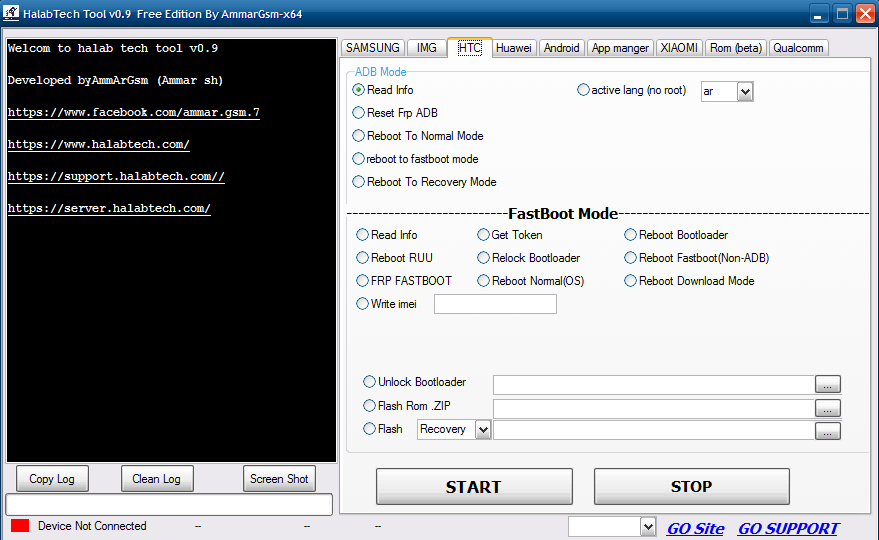
● HTC Function:
●ADB Mode
● Read ADB, || Active lang (NO Root)
● Reset FRP ADB
● Reboot to Normal Mode
● Reboot to Fastboot Mode
● Reboot to Recovery Mode
● Fastboot Mode:
● Read info || Get Token || Reboot Bootloader
● Reboot RUU || Relock Bootloader || Reboot Fastboot (non ADB)
● FRP Fastboot || Reboot Normal (OS) || Reboot Download Mode
● Write IMEI
● Unlock Bootloader
● Flash ROM .ZIP
● Flash Recovery
● Xiaomi Functions:
● ADB Mode:
● Read info || Enable Diag (Root)
● Reset FRP (ADB)|| Enable Diag (No ROOT)
● Reboot to Normal Mode
● Reboot to Fastboot Mode
● Reboot to Recovery Mode || Bypass Mi Account (ADB)
● Xiaomi Disable update By TWRP || Xiaomi Disable Mi Account permanently (ADB)
● Enable Diag Root (New)
● FastBoot Mode:
● Read Info
● Read Security
● MTK (Beta) Functions:
●Manual:
● DA File
● Scatter
● Auth
● Auth:
● Huawei JAT- ×××=>> Select Model
● Huawei AMN-×××=>> Select Model
● Huawei MRD-×××=>> Select Model
● Huawei KSA-×××=>>>
● Reset FRP || Format
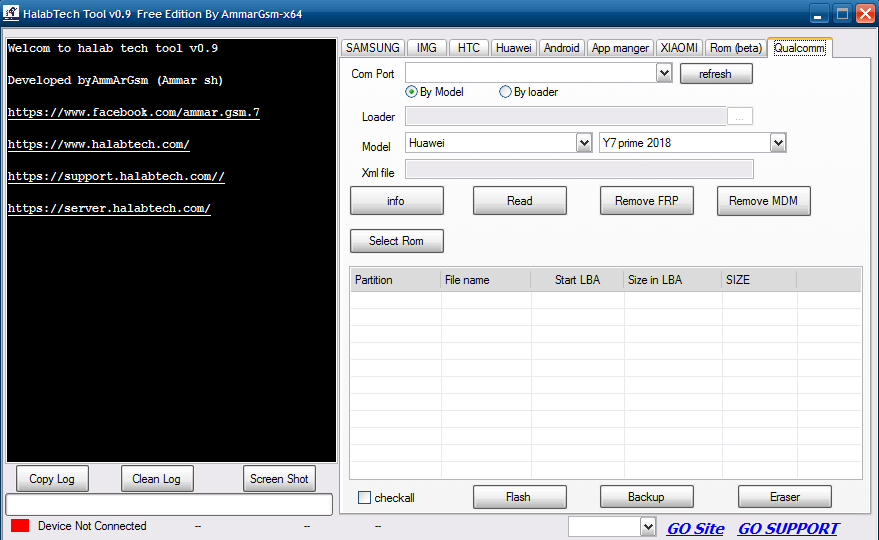
● Qualcomm Functions:
● Comport
● Loader
● Model
● XML File
● Info || Read || Remove FRP || Remove MDM
● Flash || backup || eraser
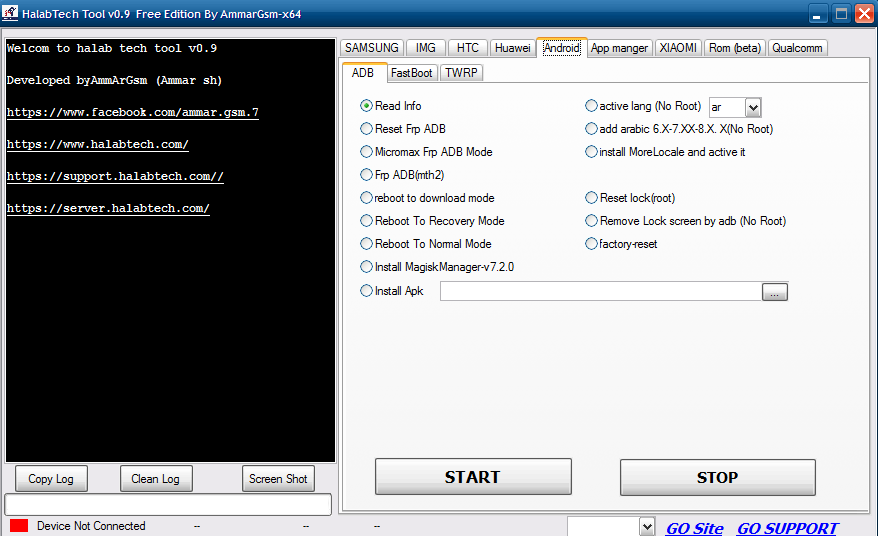
● Android Functions:
● ADB:
● Read Info || Active lang (No Root)
● Reset Frp ADB || add Arabic 6.×-7.××-8×.×(No Root)
● Micromax Frp ADB Mode || install more Locale and active it
● Frp ADB ( Method2)
● Reboot to download mode || Reset lock (root)
● Reboot To Recovery Mode || Remove Lock screen by ADB (No Root)
● Reboot To Normal Mode || Factory reset
● Install MagiskManagerv7.2.0
● Install Apk
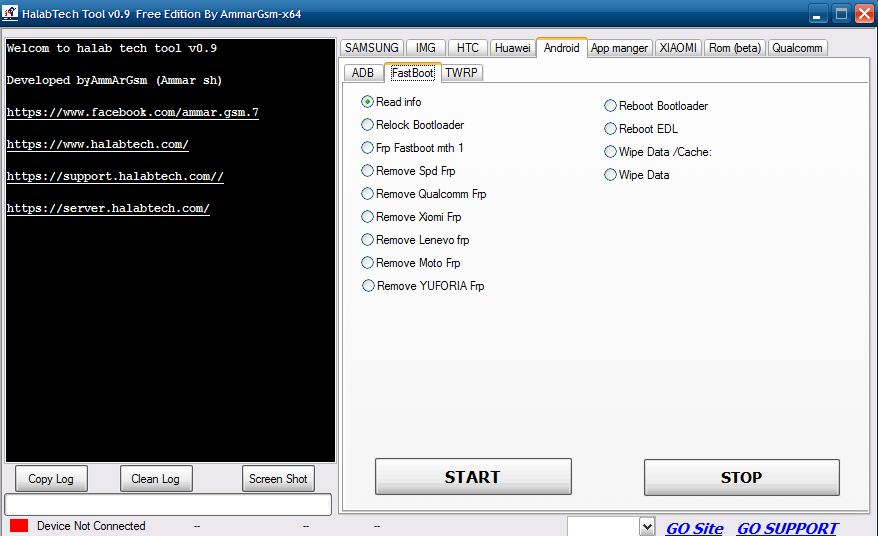
● Android FastBoot Functions
● Read Info Reboot Bootloader
● Relock Bootloader || Reboot EDL
● FRP Fastboot Method 1 || Wipe Data/Cache
● Remove Sod Frp || Wipe Data
● Remove Qualcomm FRP
● Remove Xiaomi FRP
● Remove Lenovo FRP
● Remove Moto FRP
● Remove YUFORIA FRP
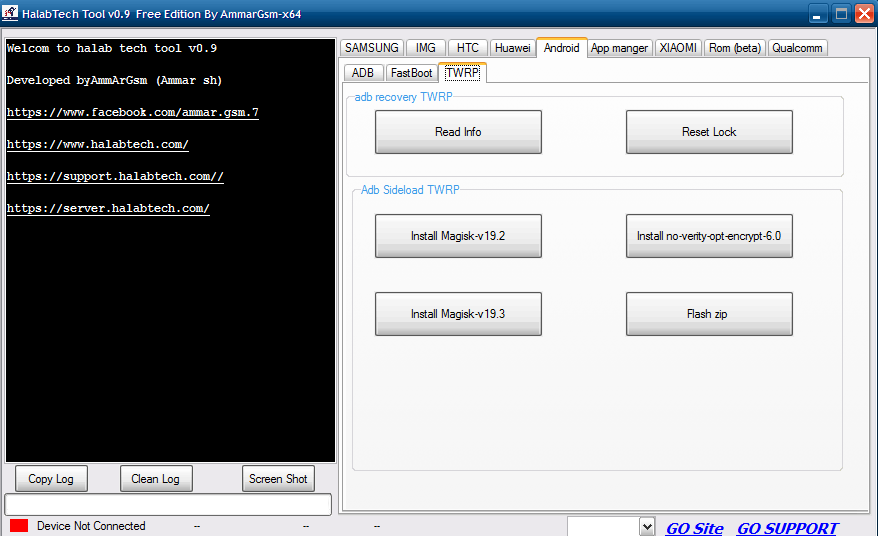
● Android TWRP Functions
●ADB Recovery TWRP
● Read Info || Reset Lock
● ADB Sideload TWEP
● Install MAGISK V20.4 || Install-Verify-opt-encrypt-6.0
● Install MAGISK v19.3|| Flash ZIP
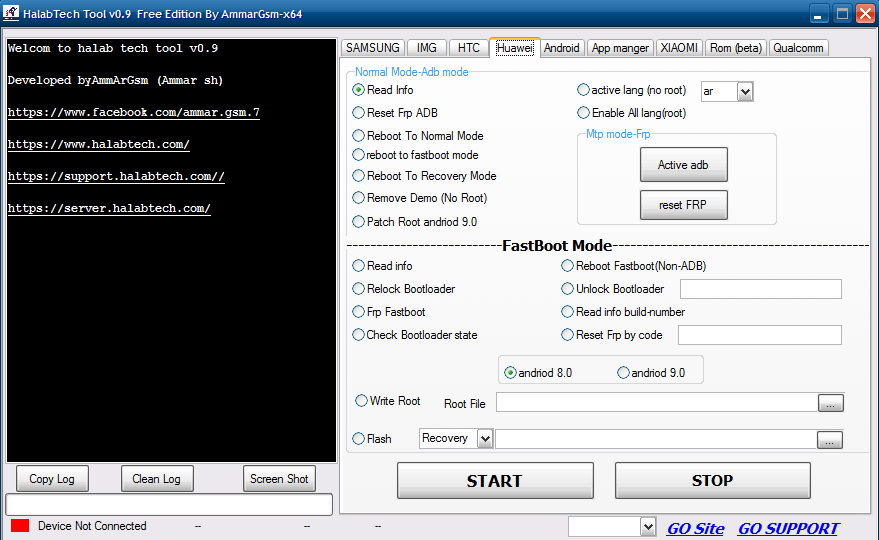
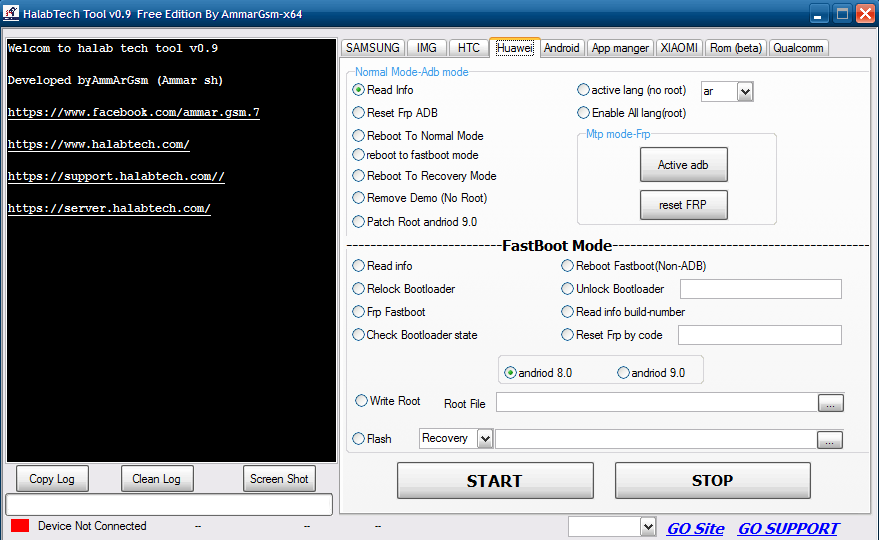
● Huawei Functions:
●Test Point:
● Comport {Refresh}
● Select CPU
● Select Model
● Load Fastboot & Read Info
● Reset FRP
● Start || Stop
● Huawei ADB Mode Functions
●Read Info || Active lang (No root)
● Reset FRP ADB || Eanable all lang (root)
● Reboot To Normal Mode
● Reboot To fastboot mode
● Reboot To Recovery Mode
● Remove DEMO (No root)
● patch ROOT Android 9
● Huawei FastBoot Mode
Functions
● Read Info Gett Token || Reboot Fastboot (Non-ADB)
● Relock Bootloader || Unlock Bootloader
● FRP FASTBOOT || Read Info build Number
● Check Bootloader state || Reset FRP by code
● Write Root.
● Flash Recovery.
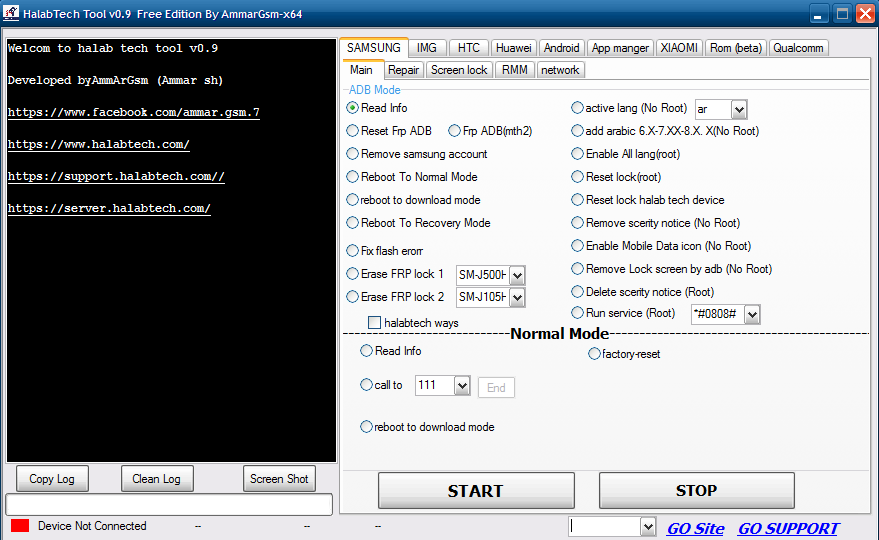
● Samsung Functions :
What’s new in the latest builds?
Fixed
some tools that were no longer downloading properly.
Downloads are no longer limited to 4 GB in size.
Downloads are now much faster thanks to bigger buffers and
multithreading.
Users
can now select th desired UI theme to use: A light background
theme with dark text, or a dark background with light text.
Improved the UI with a light theme.
Improved the tools’ tooltips.
Improved compatibility with all Windows themes, including the
contrast ones.
Added a
new group to the list: Windows and Office
INstall This new group contains tools that help in Winows
and office download, installation and install media creation.
Also moved the following tools to this group:
NTLite (Install & Run),
Windows 10 Build Updater,
Windows 10 install media creator,
Windows 8.1 Install Media Creator and
Windows and Office Download Tool.
Improved icon consistency for the buttons and the context menu.
Added
64-bit download and install options to the
7-Zip ‘Install only) tool. That was because we realized
that installing the 32-bit version did not integrate with the
Windows shell.
Added a
new option for running tools: Do not
re-install up-to-date applications. When this option is
enabled, applications that are already installed and up to date
will not be re-installed. This can save lots of time and let you use TTS to
quickly update installed applications
Added a
new button to the list’s menu: Check all
installed apps. This new feature lets you quickly tick
all applications that are already installed in the local
computer, allowing you to easily updating or uninstalling them.
Added a
new group to the list: Ransomware decryptors and
tools. This new group is intended to help recover from
ransomware infections and contains many tools for that effect,
such as links to ransomware type identifucation, downloading
decryptors and cleanup ransom notes and other files.
Added
two new buttons to the list’s menu: Check
all portable tools, and Check all
installing tools. This new features let you quickly tick
all tools in the list that correspond to the chosen criteria
(portable tools or installing tools).
Added a
new option in Settings: The tool finder
searches item names and also descriptions.
Windows
troubleshooters now start the diagnosis automatically, which can
save some time.
General debugging
and improvement. Also improved the UI in version 7.0 and 7.5, which
includes a new progress dialog box with more details and a light
interface with a resizer and a border.
Added a
new group to the list: Essential tools from ths
store.
Because we can not download tools directly from the store, tools
in this new group take you to the online page of each tool,
allowing you to install tools from there. All tools in this
group can be uninstalled from Tech Tool Sore directly.
Added a
new group to the list: Online tutorials.
This new group contains links to your favorite online tutorials
about computer tech.
Added
support to decompress several file archive types:
7z, lzma,
cab, zip,
gzip, bzip2,
Z and tar.
Previously, only ZIP archives were
supported. This also fixed the issue of not extracting password
protected archives correctly.
Added a
new option: Keep a local copy of downloaded
archive files after successful extraction. This new option
can be found in the Settings dialog box,
Options tab, and controls whether the
archives that are successfully updated and extracted should be kept.
By default, those archives are deleted to save storage space.
The
following tools were added to the latest builds:
Лёгок и понятен
Если вы никогда раньше не работали с Pro tools, ты вы удивитесь насколько он лёгок в освоении и интуитивно понятен.
Скачайте торрент русской версии Pro Tools 12 и вы получите уникальный движок Avid Audio Engine, который имеет 64-битную архитектуру, входной input-буфер с низкой задержкой и возможностью динамически распределять ресурсы обработки между десятками плагинов.
Нагрузка на ядра процессора распределяется с максимальной эффективностью, что позволяет добиться потрясающей производительности все системы в целом. Окно загруженности системы показывает текущую активность на каждом ядре во время воспроизведения.
К сожалению, до сих пор нет встроенной коррекции высоты тона. Современные DAW(секвенсоры), такие как Apple Logic Pro X и PreSonus Studio One, прекрасно интегрируют коррекцию высоты тона с редактированием на уровне сэмплов, без необходимости передавать или экспортировать аудио в сторонние плагины.
Avid продает Antares Auto-Tune в своём магазине за $349, хотя я предпочитаю Synchro Arts Revoice ($599) — великолепный плагин, который позволяет выстроить и настроить одновременно несколько партий бэк-вокала по высоте и времени, а также позволяет убрать «эффект дублёра», плюс имеет поддержку для более точного редактирования видео.
Запись MIDI и VST-инструменты
Avid Pro Tools обладает достойным выбором собственных виртуальных инструментов, что позволит получить практически любое звучание, это огромное поле для экспериментов и поисков своего уникального звучания.
Однако, как всегда отсутствует поддержка плагинов VST и AU, которые являются двумя самыми распространенными форматами. Большинство основных плагинов от East West, Spectrasonics, iZotope и Native Instruments, предлагают Pro Tools-совместимые версии своих плагинов, так что впринципе эта проблема решаема.
Это просто чтобы вы были в курсе, если вы новичок в Pro Tools, то у вас могут возникнуть проблемы с поиском совместимых версий некоторых менее известных любимых плагинов. Например, мне не повезло с моей любимой коллекцией Korg Legacy. Если вы «привязаны» к определенному набору сторонних плагинов, убедитесь, что каждый из них имеет совместимую версию для Pro Tools.
В добавок Avid встраивает доступ к Marketplace, app store компании, если вы хотите делать покупки, покупать и загружать дополнительные плагины непосредственно из компании. Короче, выбирайте версию и качайте торрент Pro Tools 12, не пожалеете))
Our Review
- Pros
- Easy to use
- Easy to install
- Troubleshoots issues effectively
- Cons
- None
How to install Hextech Repair Tool
You can deploy Hextech Repair Tool on your Windows PC without significant efforts. All you have to do is download the installer executable (obviously) and launch it. The installer will probably ask for your permission a couple of times.
After you grant it access to perform modifications on your system (required), the installation will carry on automatically. No additional assistance will be requested from you, as the installer will take care of everything. You won’t be even able to choose the destination path.
However, it’s worth mentioning that Hextech Repair Tool will head wherever the game is installed. It will identify the drive you’ve installed League of Legends on, and create a “Riot Games\Hextech Repair Tool” folder combination in the root directory.
User-friendly interface
If you’re not exactly tech-savvy, don’t fret. This is exactly the reason why this tool was developed in the first place. You can use it to troubleshoot various issues with League of Legends without being a PC expert. You can stick to your gaming and Hextech Repair Tool will do the rest for you.
After installation, Hextech Repair Tool will be launched automatically. Therefore, if you’ve already installed it, you should now be facing the marvelous main screen of this program. Here you can perform a bunch of configurations before you launch the troubleshooter. Let’s see what those are.
How to use Hextech Repair Tool
In the main screen, you’ll be able to see a bunch of checkboxes, a region selection dropdown menu, and a couple of buttons used to toggle between Options and Task Log sections. Note that the Task Log will initially be empty if you didn’t run any assessments before (i.e. pressing “Start”).
In the region selection section you’ll also be able to see a bunch of status buttons. These provide you with a quick overview of the current situation regarding the game itself, the store, the website, and the client.
Hextech Repair Tool can be used to run ping tests, synchronize your system clock, gather system and LoL logs, force the repatching of the game, reinstalling the game altogether, create a firewall exception (which subsequently enables it), disable the firewall, and choosing between auto and public DNS servers.
Once you’ve selected the options you’re interested in, you can just click Start. That’s it!
Collects system logs for future investigation
If Hextech Repair Tool doesn’t cut it for you, then you might need to address your issue to a higher entity: the tech support crew. However, you can greatly simplify the support team’s tasks by providing them with useful insight, which this tool can help collect.
All you have to do is make sure that the “Gather System & LoL Logs” checkbox is selected before pressing start. The app will collect various helpful information bits from your system and LoL logs and will conveniently place them within a ZIP file.
Note: if you’re not comfortable with Hextech Repair Tool harvesting info from your PC, you can turn this feature off. You can still enjoy every other of its features, minus the log collection part.
Handy automated troubleshooting tool for League of Legends
To wrap it up, if you’re experiencing technical issues with League of Legends and don’t know what to do, Hextech Repair Tool can help you perform automated troubleshooting. It can also collect a bunch of system and LoL logs in case you’ll need to hand them over to the real experts.
You can download and install the Hextech Repair Tool for free, as there’s no cost associated with it. It comes with a user-friendly interface and can be used even by novices, regardless of PC operating skills and/or previous experience with similar software solutions.
FAQ: learn more about Hextech Repair Tool
How to use Hextech Repair Tool?
After installing it on your PC, you just run it, configure it to your liking and hit the Start button. It will automatically attempt to fix whatever’s wrong with League of Legends on your computer.
How long does Hextech Repair Tool take?
Depending on the issue(s) you’re facing, Hextech Repair Tool might take longer or patch things up in a jiffy. For instance, if it’s a DNS-related issue, it gets solved on the spot, but a complete reinstallation of the game can take several minutes.
How to run Hextech Repair Tool as admin?
Как Пользоваться BTC Tools?
Шаг 2 — Запустите сканер
Утилита автоматически импортирует текущий диапазон IP-адресов. Если диапазон IP-адресов правильный, вы можете нажать кнопку «Scan», чтобы начать сканирование майнеров. Придется подождать, пока сканирование не будет завершено. 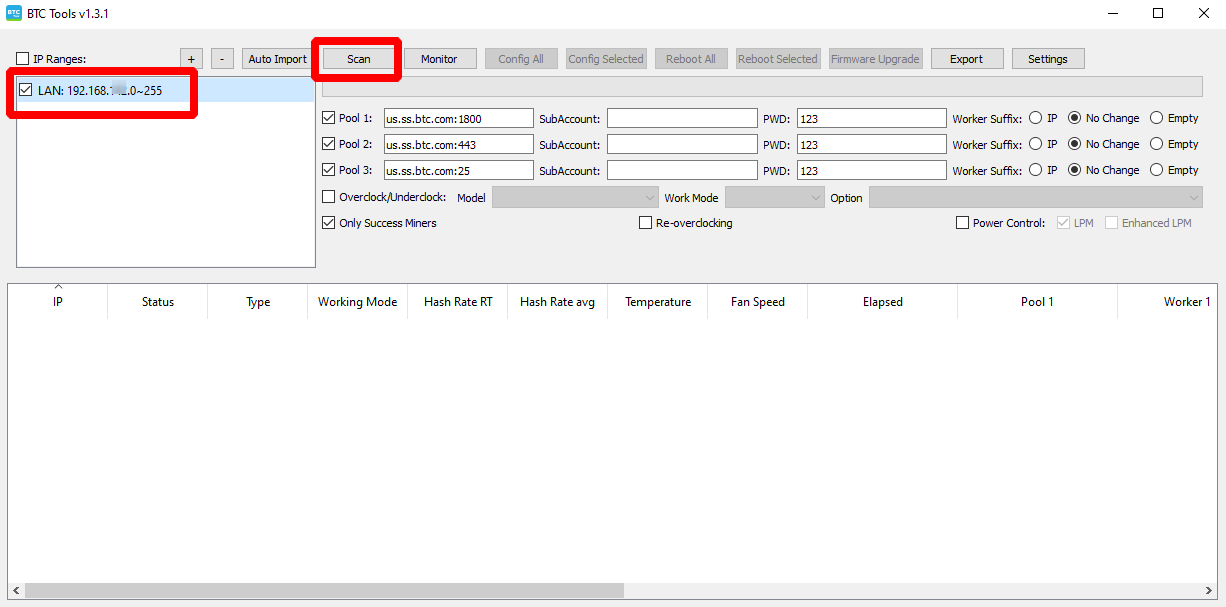
Если диапазон IP не верный, то кликаем дважды по области с ip адресом и добавляем нужные диапазоны адресов.
Когда программа находит майнер, она отобразит основную информацию (включая IP, тип майнера, скорость хеширования, температуру, скорость вращения вентилятора, прошедшее время, пулы и имена воркеров) в таблице.
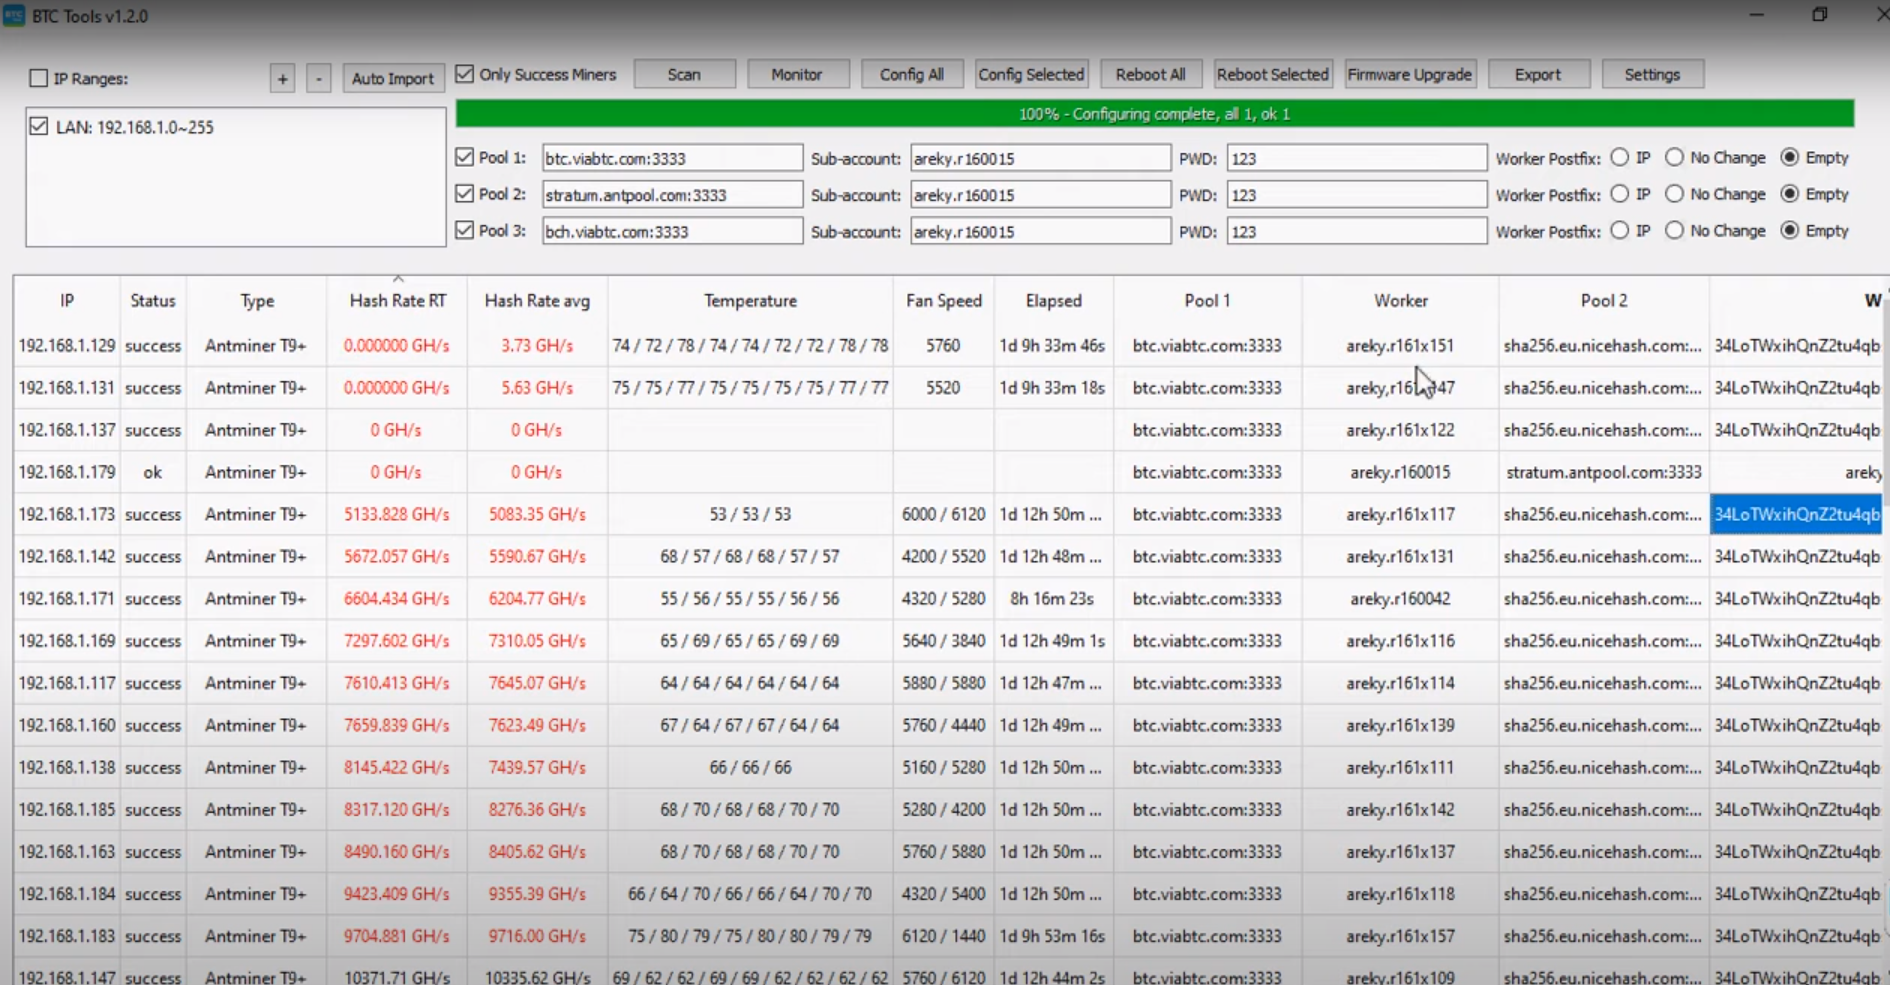
По умолчанию утилита отображает информацию только о успешно идентифицированных майнерах. Если вы хотите отображать информацию о каждом просканированном IP-адресе, снимите флажок «Only Success Miners».
Софт отобразит все включенные майнеры в сети далее остается выбрать нужный ip адрес и ввести его в адресную строку браузера или дважды кликнуть по нужному устройству и его веб интерфейс откроется в браузере.
Каждый столбец в таблице можно сортировать. Щелкните заголовок столбца — вы можете отсортировать его по возрастанию. Щелкните еще раз и отсортируйте в порядке убывания. (Температура сортируется по максимальному из нескольких значений, а скорость вращения вентилятора сортируется по среднему значению.)
Если вы видите выделенный (красный) элемент в таблице, это означает, что значение майнера выходит за пределы нормального диапазона.
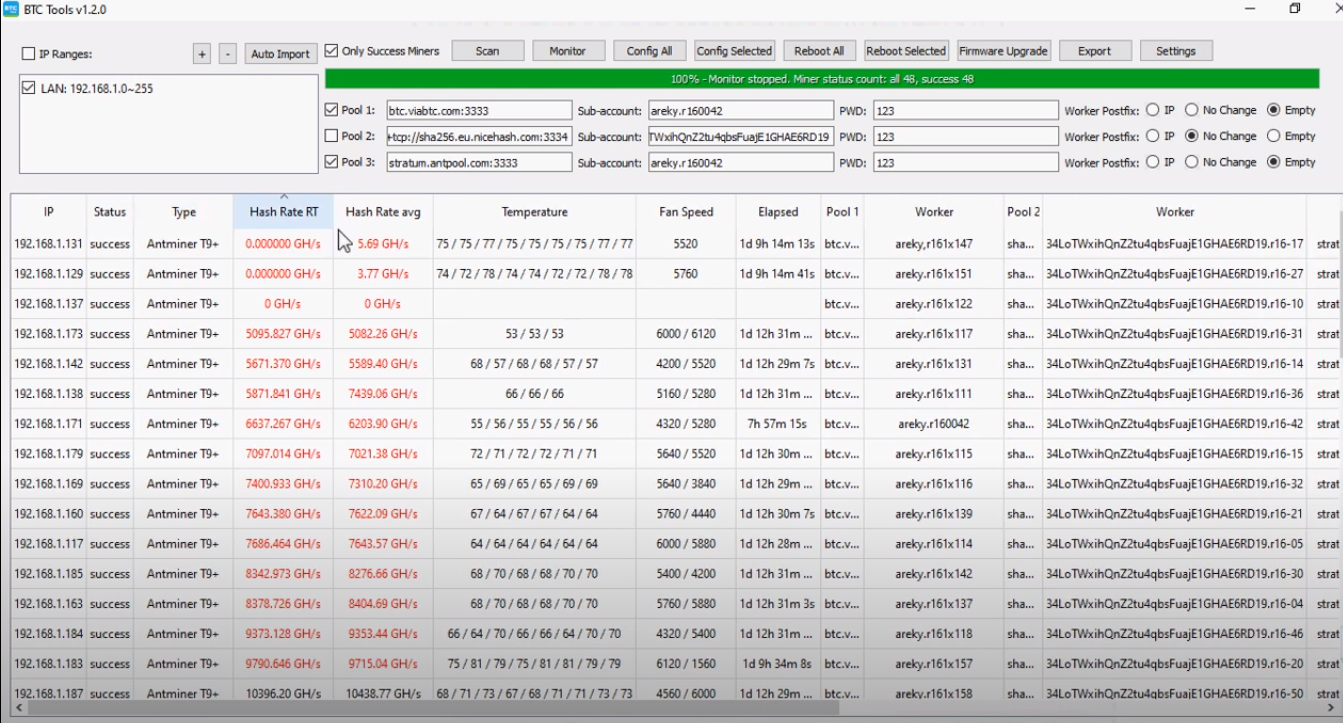
Шаг 3 — Внесите настройки
Если вы хотите изменить пул одного или всех устройств, просто введите адрес пула, имя дополнительной учетной записи (окончание «.» можно опустить, программа автоматически добавит его за вас) и пароль (можно оставить пустым). Выберите тип постфикса имени воркера. Затем нажмите кнопку «Config Selected Miners» («Настроить выбранные майнеры)» или «Config All Miners» («Настроить все майнеры»). 
- При использовании функции «Config Selected Miners» вам необходимо выбрать АСИКИ. Щелкните любую ячейку в таблице майнеров, затем ячейка станет синей — вы выбрали майнер ее строки (вам нужно только выбрать ячейку, не нужно выбирать всю строку).
- Вы можете перетащить мышь, чтобы выбрать несколько последовательных майнеров. Или, удерживая клавишу Ctrl, щелкните несколько отдельных строк.
- Другой способ выбрать несколько последовательных майнеров: щелкните начальный майнер, удерживайте нажатой клавишу Shift, затем щелкните конечный майнер.
Если вам нужно перезапустить устройства, нажмите кнопку «Reboot Selected Miners» («Перезагрузка выбранных майнеров») или «Reboot All Miners» («Перезагрузить все майнеры»). Программа может перезагружать только Antminers, перезагрузка Avalon находится в разработке.

Три версии Pro Tools
Первая версия — AVID Pro Tools First
Существуют три основные версии Pro Tools. Avid снова представила бесплатный продукт, который теперь называется First. Он дает вам 16 аудио и 16 MIDI-треков, с возможностью одновременной записи до четырех аудио-входов.
Бесплатная версия программы позволяет получить общее представление о софте, понять подходит ли он вам. Как и положено, В бесплатной версии имеется ряд ограничений функционала, который не позволит в полной мере ощутить всю мощь и удобство этого продукта.
Вторая версия — AVID Pro Tools

Так называемая «стандартная» версия стоит 599 долларов, что на 100 долларов меньше, чем раньше. За эту цену вы получаете софт что называется «навсегда», но период бесплатных обновлений будет составлять 12 месяцев, что не может не расстраивать((
После этого Подписка на «саппорт» составит 29,99 долларов в месяц, в это счастливое время вы также будете получать полные обновления версии по мере их доступности.
С Pro Tools native(стандартная) вы cможете одновременно воспроизводить до 128 стерео-треков с частотой 48 кГц, 64 трека на 96 кГц или 32 трека на 192 кГц с одновременной записью до 32 треков. Вы также получите 512 MIDI-треков, 512 инструментальных треков, 128 вспомогательных треков, неограниченное количество видеотреков.
Третья версия — AVID Pro Tools HD(Ultimate)
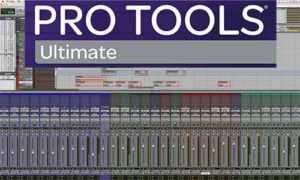
Однако, если количество дорожек окажется не достаточным, тогда клиенты профессионального уровня захотят взглянуть на Pro Tools HD ($999). Pro Tools HD-Ultimate увеличивает количество звуковых дорожек до 256, плюс 192 одновременных входа записи.
HD версия также предоставляет все виды поддержки многослойного редактирования видео (до 64 треков!), объемное микширование и многое другое.
Для этого обзора я тестировал Avid Pro Tools 12.8.1 на двух машинах: Intel Core i7 PC с 16 ГБ оперативной памяти, SSD 256 ГБ и жестким диском 3 ТБ; и MacBook Air 13-дюймовый с 8 ГБ оперативной памяти, внутренний SSD 256 ГБ и внешний диск 4 ТБ.
На обеих машинах я тестировал Pro Tools, используя Аудио Интерфейс PreSonus AudioBox и MIDI-контроллер M-Audio Oxygen 25. Я смог добиться низкой задержки записи и воспроизведения на обеих машинах с AudioBox с небольшими проблемами.
Исправьте проблему с запуском в Ubuntu 16.04
Используйте прокси для snap store
Если вы медленно загружаете приложения из магазина snap, вы можете подумать о настройке прокси:
Snap поддерживает протоколы , и .
подписывайтесь
Окно настроек:
Существуют ли альтернативы? Да, например:
- IP Reporter
- APMinerTool
Решение проблем
Не работает?
Используйте инструкцию из пяти шагов по устранению проблем:
- Проверьте подключение к сети или Интернету.
- Проверьте или сбросьте настройки роутера или переключателя.
- Проверьте конфигурацию сети майнера и конфликты IP-адресов.
- Перезагрузите майнер.
- Восстановите плату управления или сбросьте к заводским настройкам.
Если программа не работает, то попробуйте использовать альтернативные решения, которые описаны выше в статье.
Программа поддерживает экспорт настроек. Можно попробовать настроить программу на 1 ПК, а затем сделать экспорт настроек.

Софт поддерживает большинствд майнеров Antminer и часть майнеров Avalon, включая AntminerS17, T17, S9, S7, T9 и т. д. А также серии AvalonA8, A7, A6 и т. д. (Функция перезагрузки доступна только с Antminers, доступно сканирование и настройка как с Antminers, так и с Avalon Miners.)


![Btc tools (antminer) [v1.3.3]: скачать, как пользоваться](http://dima-sychev.ru/wp-content/uploads/2/c/9/2c9832563646419237753b1db8518905.jpeg)
![Hextech repair tool [download latest version] • lol automated troubleshooting
windowsreport logo
windowsreport logo
youtube](http://dima-sychev.ru/wp-content/uploads/0/6/4/06431631e08eb6b2431975f97af188b2.jpeg)


![Hextech repair tool download for windows [latest version]](http://dima-sychev.ru/wp-content/uploads/e/9/9/e9956b90a2e23db0fb4422241ebb0cbd.jpeg)


![Btc tools (antminer) [v1.3.3]: скачать, как пользоваться](http://dima-sychev.ru/wp-content/uploads/a/2/b/a2b149b63378a4d3b66d1e51f6fa8431.jpeg)
![Hextech repair tool [download latest version] • lol automated troubleshooting
windowsreport logo
windowsreport logo
youtube](http://dima-sychev.ru/wp-content/uploads/5/3/c/53c9301b216a024e7e8500dd46695047.png)


![Hextech repair tool download for windows [latest version]](http://dima-sychev.ru/wp-content/uploads/1/6/4/16424550f9849a8876c83152d4539d05.jpeg)


![Btc tools (antminer) [v1.3.3]: скачать, как пользоваться](http://dima-sychev.ru/wp-content/uploads/c/2/8/c28c2dfa42749f4a0a675a7e1ef9c4c5.jpeg)
![Hextech repair tool [download latest version] • lol automated troubleshooting
windowsreport logo
windowsreport logo
youtube](http://dima-sychev.ru/wp-content/uploads/f/f/c/ffc36b617de59e22d95d9b2932231410.jpeg)
